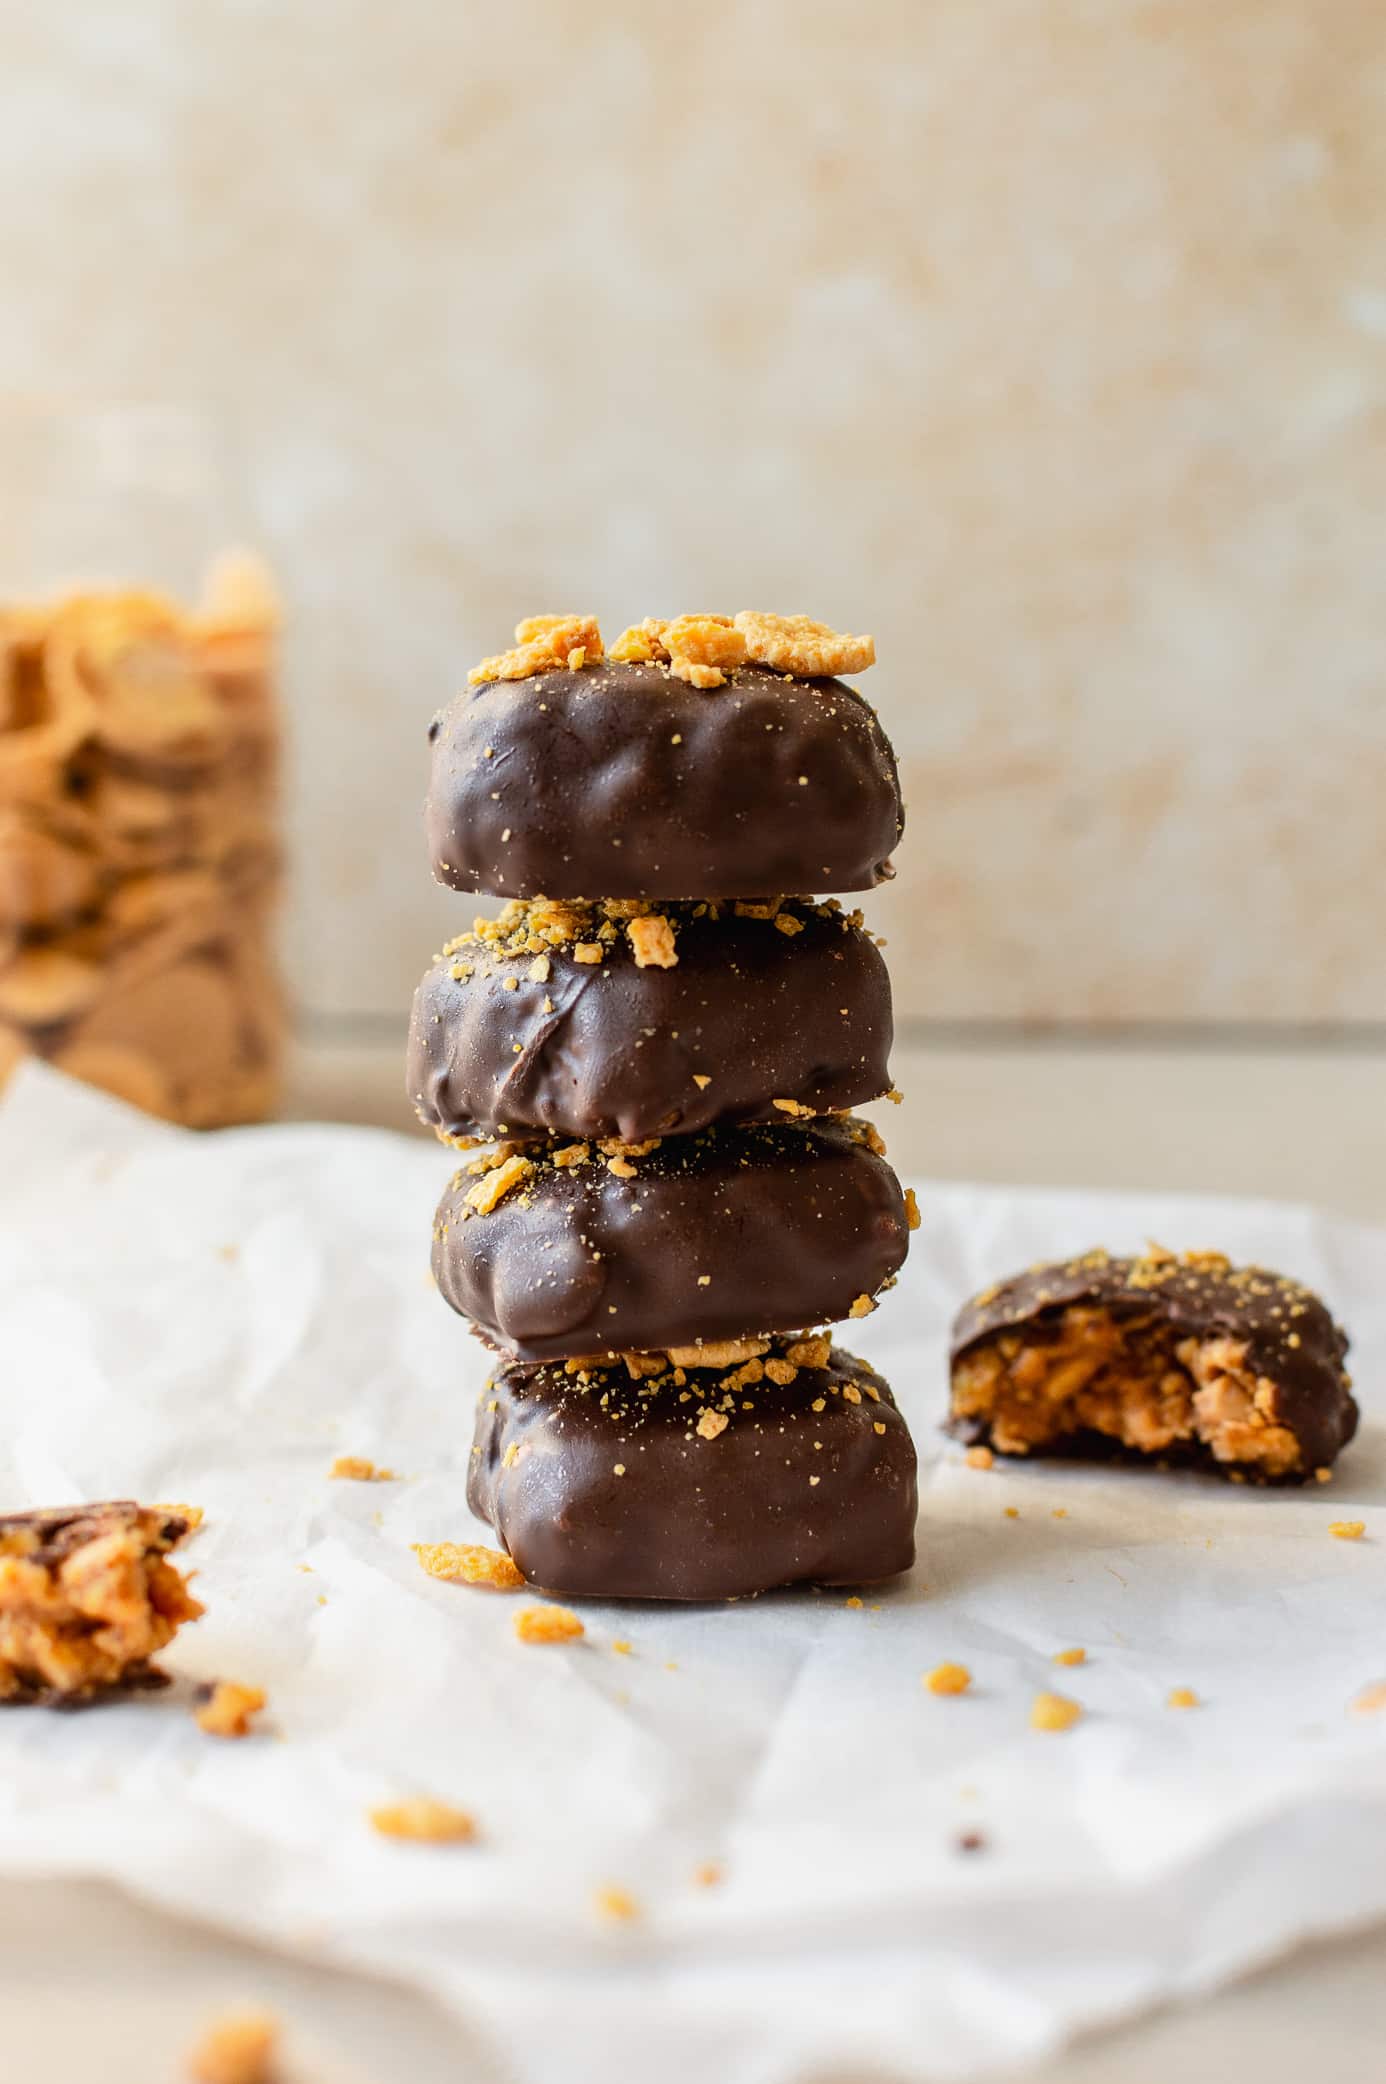
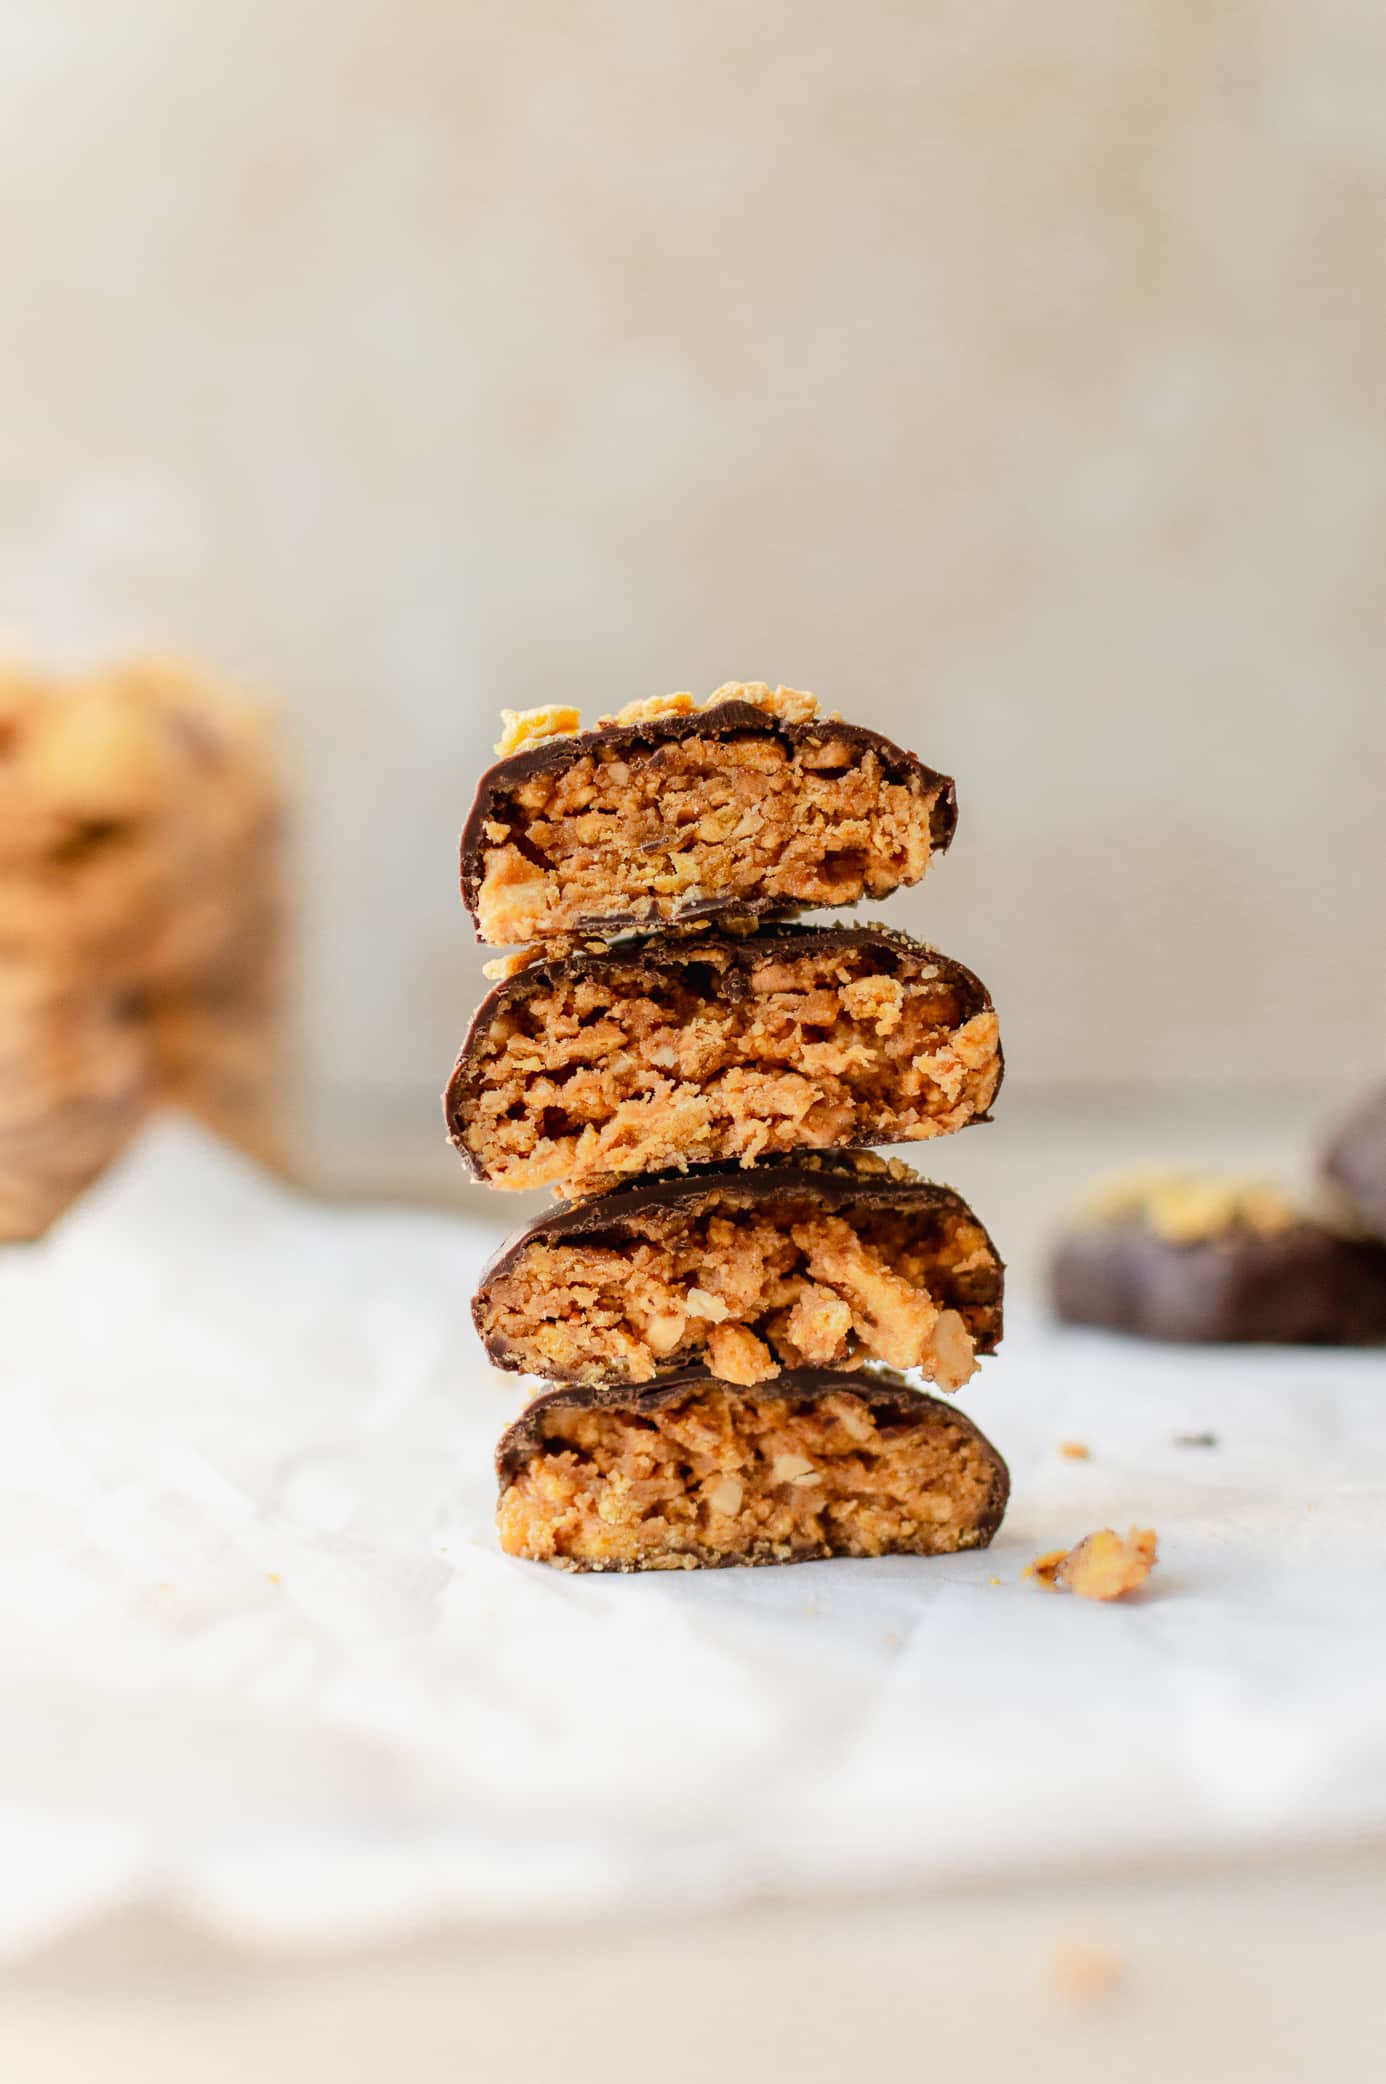
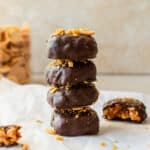
The best part of these homemade vegan Butterfingers is the signature crisp, brittle-like filling that sticks to your teeth (in the best possible way). Coated in chocolate and made with just six simple ingredients, they’re an easy no-bake treat that’s naturally gluten-free, lightly sweetened, and perfect for keeping in the freezer whenever a sweet-and-salty craving hits.
Jump to:
Why you’ll love these vegan Butterfingers
- The crispy, flaky texture is reminiscent of classic Butterfinger bars.
- Made with just 6 simple ingredients and no candy thermometer required.
- Easily made into full-sized bars, bites, or mini candy squares.
Ingredients
Filling
- Corn flakes: Nature's Path GF corn flakes are naturally sweetened with fruit juice instead of honey, making them vegan and gluten-free.
- Crunchy peanut butter: adds structure and texture. The small peanut pieces reinforce the crisp layers and keep the filling from being too smooth or dense.
- Pure maple syrup: balances the nuttiness and softens the bitter notes from the chocolate, creating a smooth, balanced bite.
- Pure vanilla extract: rounds out the flavors and ties together the maple and peanut butter.
Thin chocolate coating
- Semi-sweet chocolate chips: just sweet enough, with a slight bitterness that keeps the candy from feeling unbalanced.
- Coconut oil: thins the chocolate to create an even coating that helps create a snap with each bite.
How to make vegan butterfingers with cornflakes
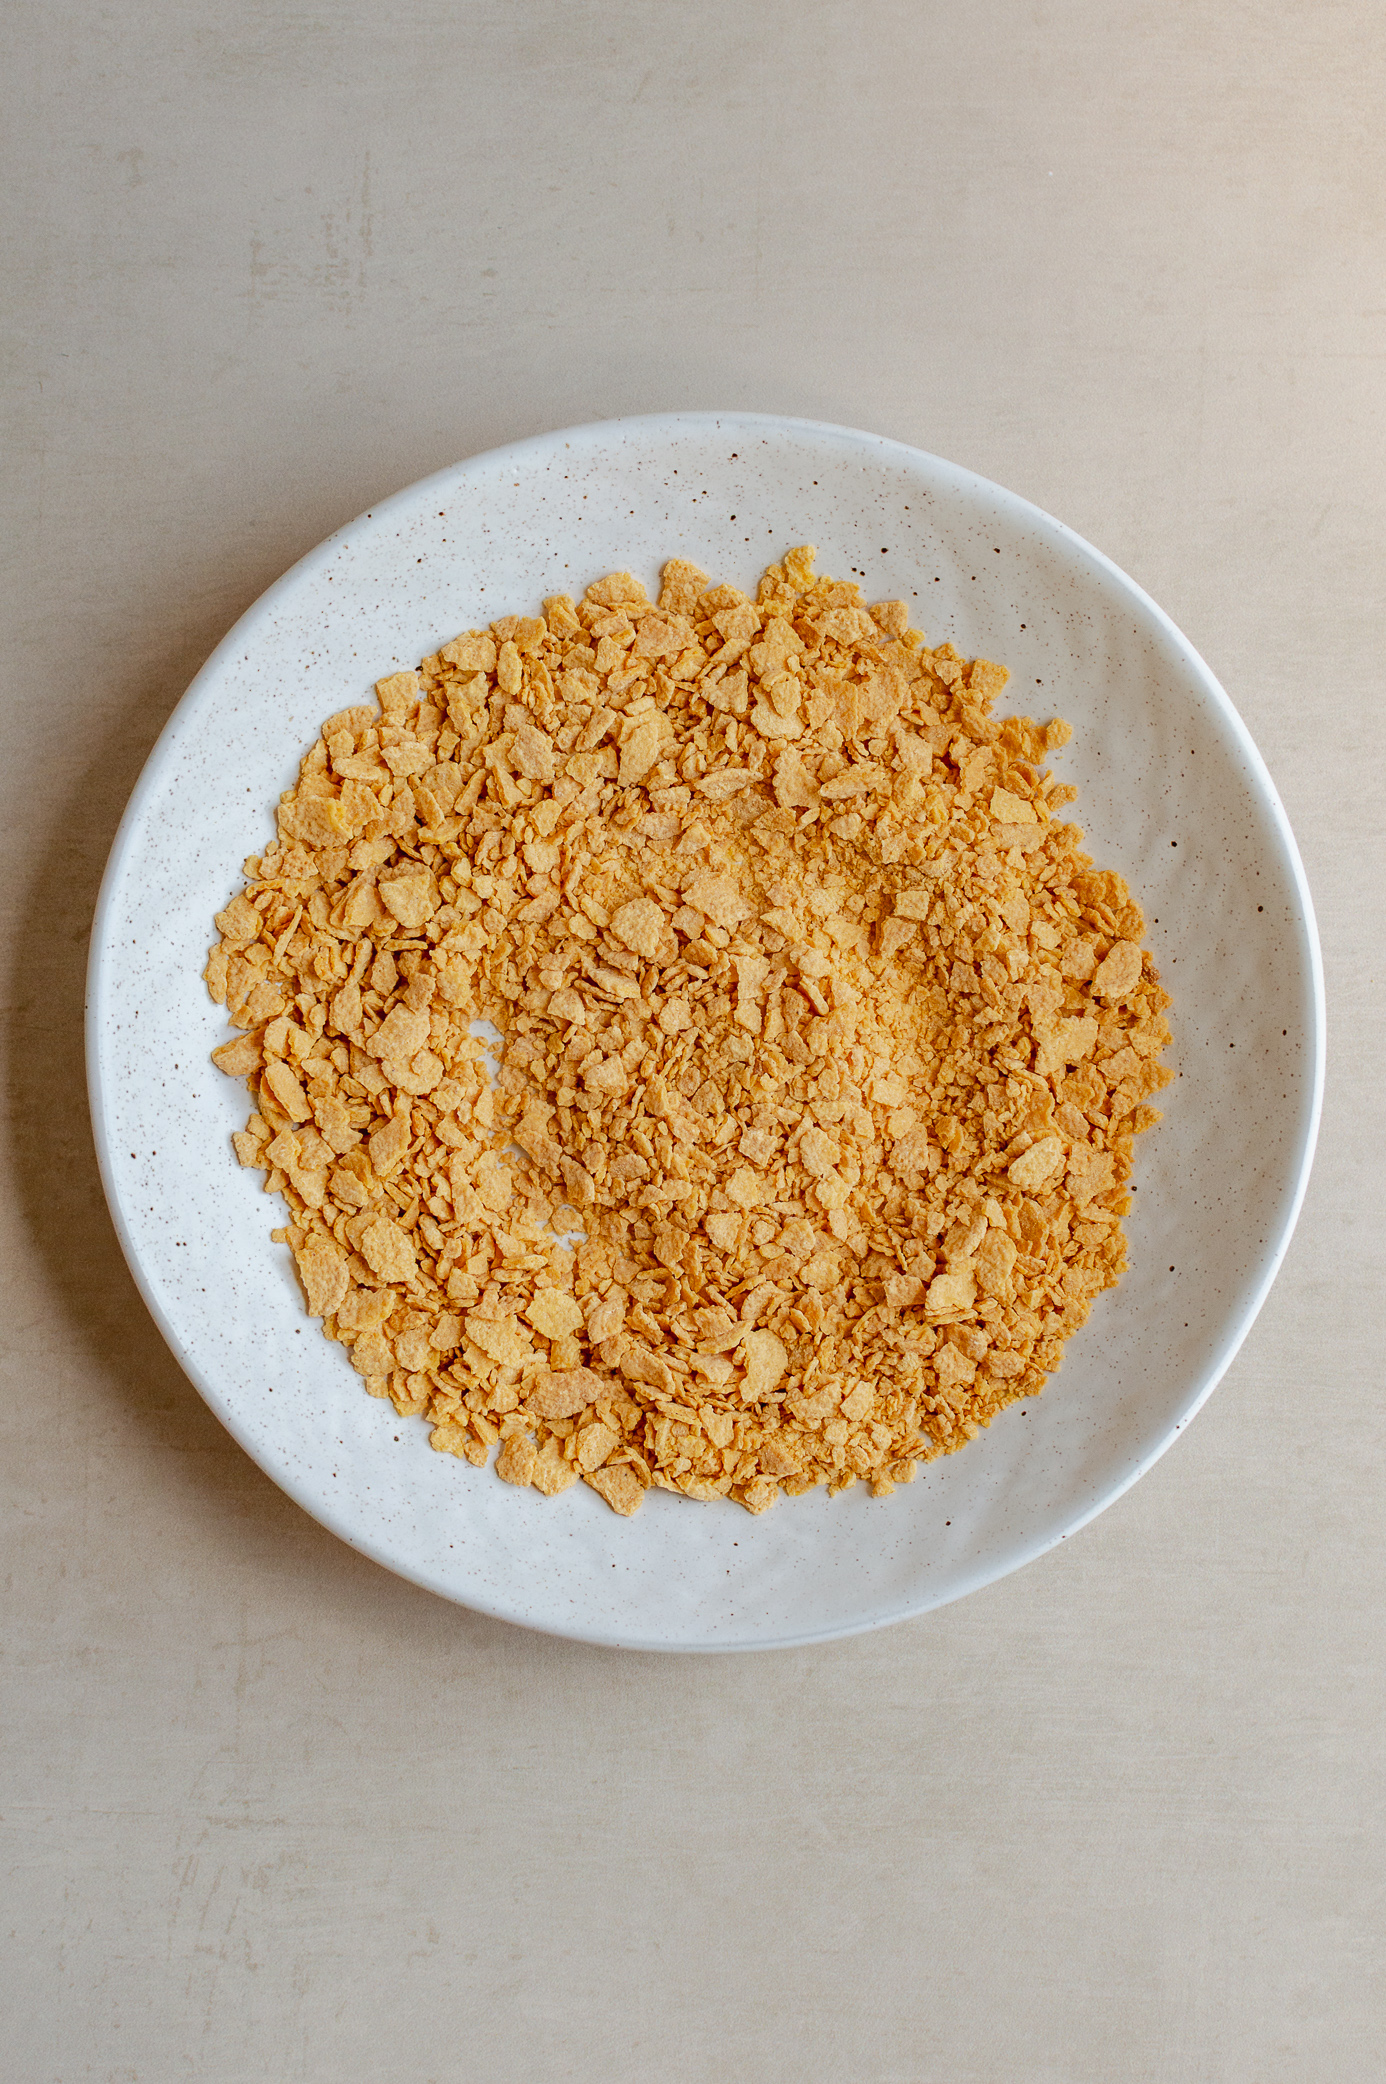
1. Crush the cornflakes
Add the cornflakes to a food processor and pulse for 15 to 20 seconds until crushed, but still slightly flaky. Avoid over-processing them into fine crumbs; the crispy texture is what gives these vegan Butterfingers their signature crunch
If you notice any large flakes, gently crush them by hand. You can also place the cornflakes in a large silicone bag or zip-top bag and crush them with a rolling pin.
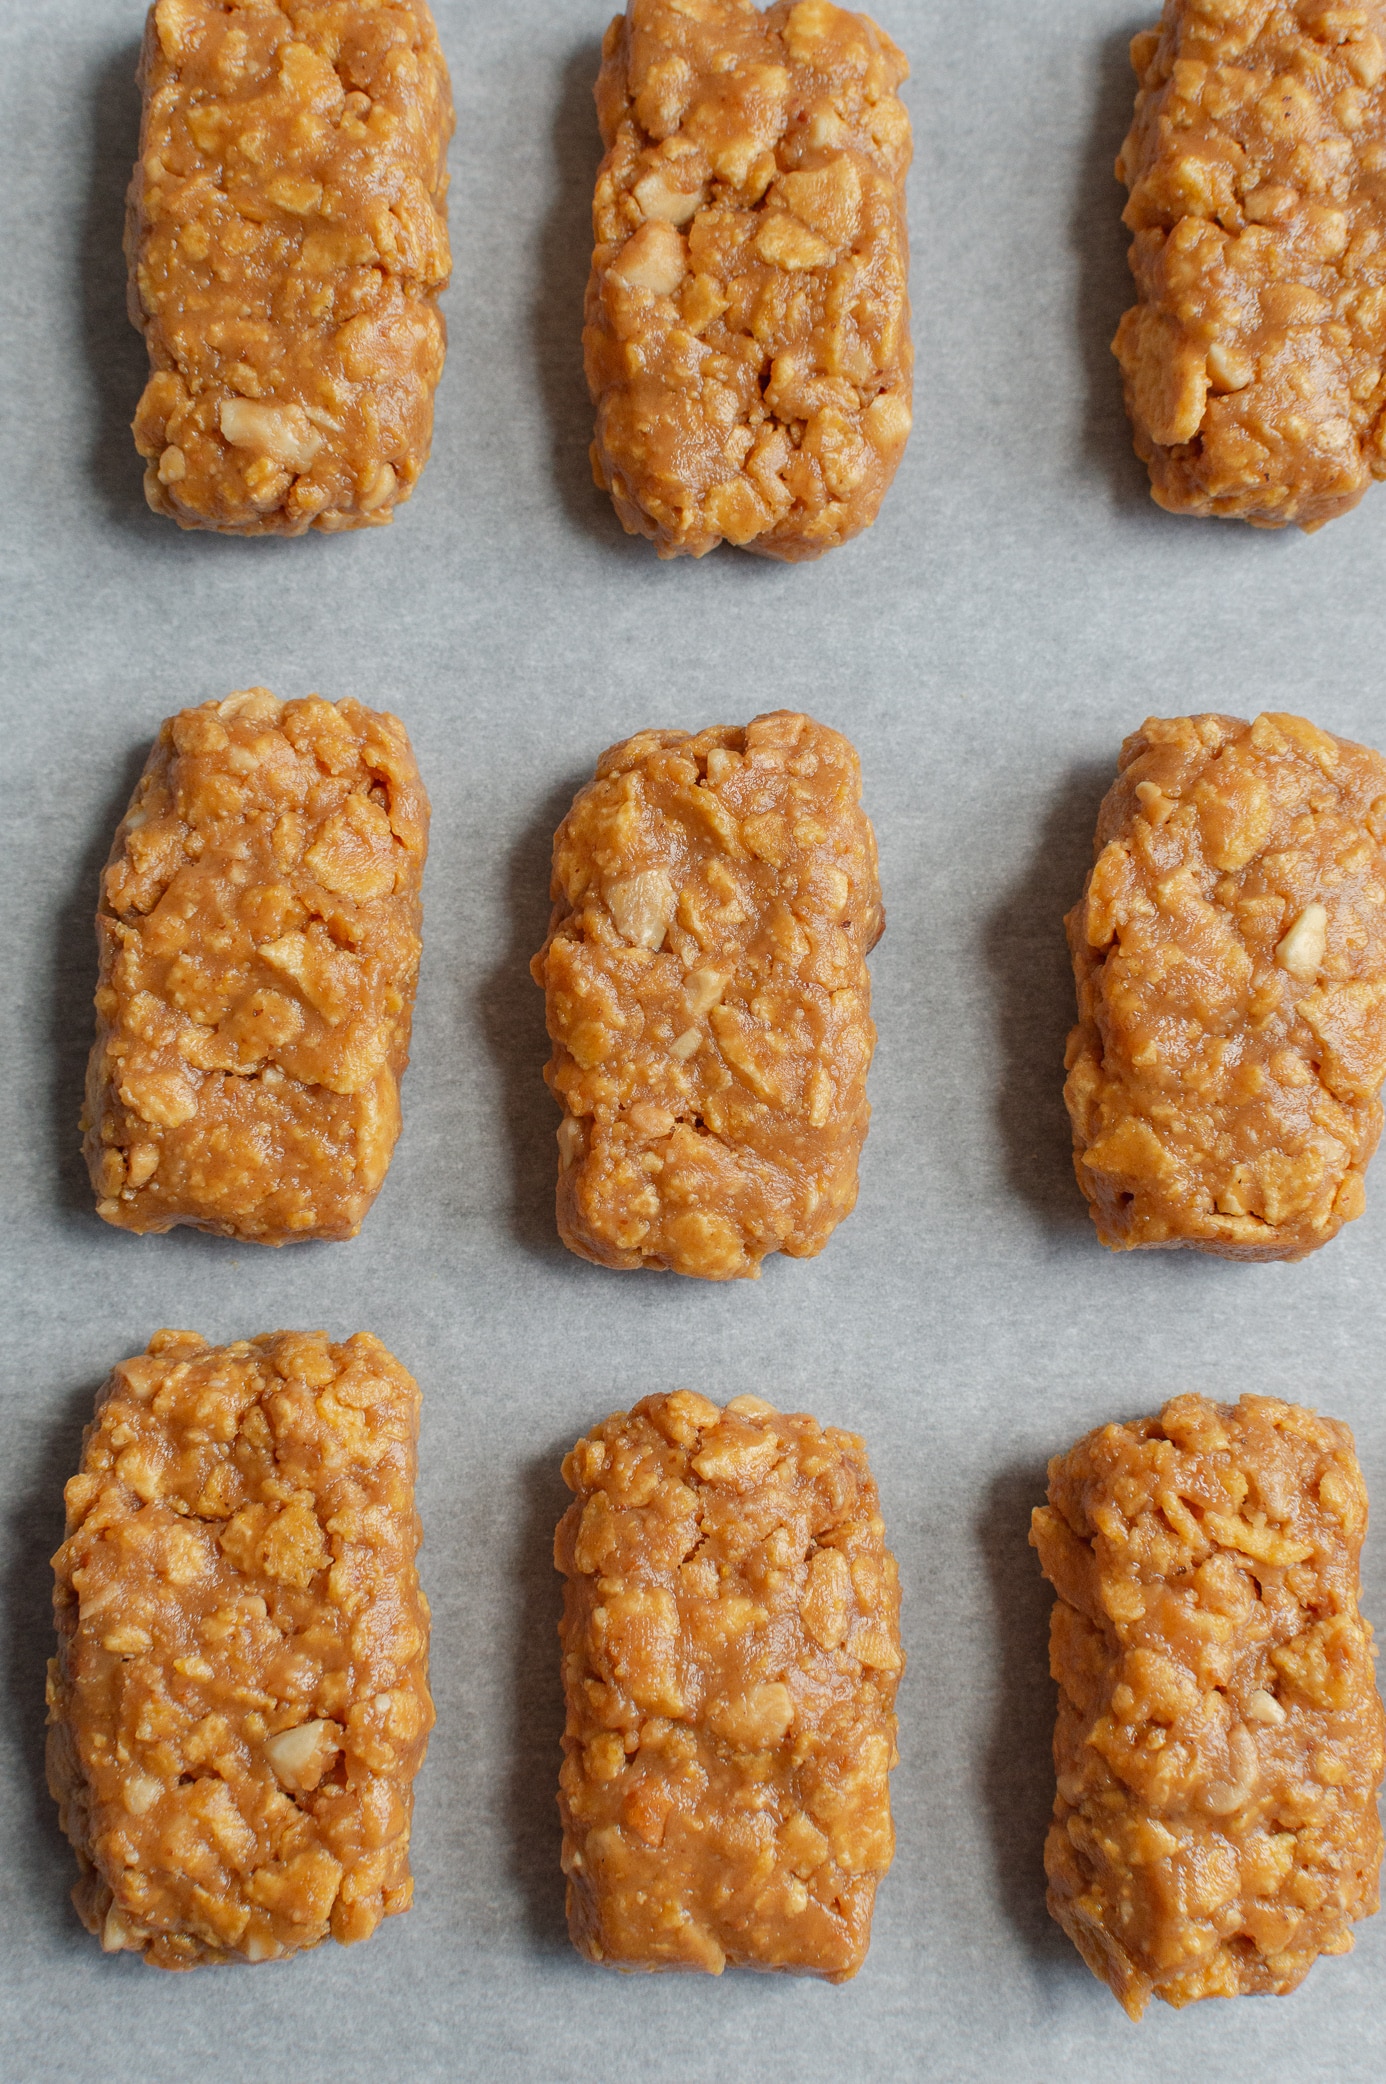
2. Make the peanut butter filling
Transfer the crushed cornflakes to a mixing bowl, then add the peanut butter, maple syrup, and vanilla extract. Stir until the mixture is evenly combined and holds together when pressed.
Use a tablespoon to scoop the filling, then shape into small rectangles or squares to resemble homemade Butterfinger bars. The recipe will make 15-18 fun-sized bars. Place them on a parchment-lined tray and freeze for 5 minutes to help set.
3. Melt the chocolate
While the filling chills, add the chocolate chips and coconut oil to a microwave-safe bowl. Microwave in 15 to 30-second intervals, stirring between each interval, until completely melted and smooth.
Let the melted chocolate cool for 1 to 2 minutes before dipping. This helps prevent the peanut butter filling from softening or falling apart during coating
4. Coat and chill
Using a fork, dip each peanut butter piece into the melted chocolate and coat all sides evenly. Gently tap the fork against the side of the bowl several times to remove excess chocolate and prevent thick pools from forming underneath.
Return the coated bars to the lined tray and freeze for 20 minutes, or until the chocolate is fully set. Once chilled, the bars should have a crisp chocolate shell with a crunchy peanut butter center.
Tips for the best homemade vegan butterfingers
- Cornflake texture: to prevent the filling from being dry or dense, leave some texture to the crushed cornflakes to achieve that crispy and flaky Butterfinger texture.
- Don't skip the cornflakes: I've tested the recipe with brown rice crisps, but the texture just isn't the same. Cornflakes give these homemade vegan butterfingers their signature crunch and layered texture.
- Use natural peanut butter: a drippy, pourable peanut butter works best for the filling. If your mixture feels too soft or wet, stir in an extra tablespoon or two of crushed cornflakes to help balance the texture.
- Freeze the filling before dipping: chilling the bars for even a few minutes helps them hold their shape and makes coating them in the melted chocolate much easier.
- Line your tray with parchment paper: it prevents the chocolate-coated bars from sticking and makes cleanup much easier.
Storage
Store the vegan Butterfingers in an airtight container in the refrigerator for up to 1 week. Keeping them chilled helps maintain the crispy texture and prevents the chocolate from softening.
For longer storage, freeze the bars in a freezer-safe container (my preferred method) for up to 2 months. They’re delicious straight from the freezer and develop an even crispier texture once fully chilled.
If stacking the bars, place parchment paper between layers to prevent sticking.
More candy-inspired recipes
- No-Churn Vegan Snickers Ice Cream Bars
- Healthy Snickers Protein Shake Recipe (Easy, Vegan)
- Chocolate Pecan Turtle Bites with Dates
- Vegan Peanut Butter Cups with Dates
📋 Recipe
Vegan Butterfingers with Cornflakes (Gluten-Free)
Equipment
- food processor optional, but helpful
- measuring cups and spoons
- mixing bowl + spatula or wooden spoon
- microwave-safe glass and fork
- parchment-lined tray or large plate
Ingredients
Crunchy Peanut Butter Core
- 1 ⅓ cups Nature's Path GF corn flakes, crushed
- ½ cup Teddie's super crunchy peanut butter sub with creamy for less texture
- 2 tablespoons pure dark maple syrup
- 1 teaspoon pure vanilla extract
Chocolate Coating
- ¾ cup semi-sweet vegan chocolate chips
- 1 teaspoon coconut oil
Instructions
- Prep: Line a small baking sheet or tray with parchment paper.
- Crush cornflakes: Add the cornflakes to a food processor and pulse until crushed but still slightly flaky. Avoid turning them into fine crumbs.
- Make the filling: Pour the crushed cornflakes into a bowl and add the peanut butter, maple syrup, and vanilla. Stir until combined.
- Shape and freeze: Use a tablespoon to scoop and shape into squares or rectangles. Depending on shape and size, you'll get 15-18 fun-sized bars. Place on the tray, then transfer to the freezer to set for 5 minutes.
- Melt chocolate: Add the chocolate chips and coconut oil to a microwave-safe bowl. Microwave in 15 to 30-second intervals, stirring between each, until smooth and melted. Let cool for a minute or two before using.
- Chocolate coating: Remove bars from the freezer. Using a fork, dip each piece into the melted chocolate, creating a thin, even layer. Tap the fork against the side of the bowl to remove excess chocolate, then return to the tray.
- Final freeze to set: Freeze for 20 minutes, or until the chocolate is fully set. Enjoy straight from the freezer.


Comments
No Comments